Connection to SQL-server on the network. Using the Windows authentication and SQL Server authentication.
In this part of a series of articles described the connection network clients TCU-3 to MS SQL Server 2005. Two options to connect to SQL Server - using Windows Authentication
and SQL Server authentication. Attached is a video tutorial that shows the complete sequence of actions described in the article.
In a previous article "Installing and Configuring SQL-server. Creating a database and connect to it TCU-3" was
demonstrated in local connection TCU-3 to the database located on the MS SQL server. Of course, when using this database is not without connections network clients.
Networks can be local and remote access, peers and hybrid - are not so important. For client-server architecture, it is important that there be a physical connection between
client and server databases. It is important that new clients were able to quickly come into operation.
So, consider the options for connecting to SQL server. Of course, you must have configured and working a local network of client computers and
database server. Setting up and connecting to local network will not be - a topic well covered in the Internet and beyond the scope of this article. Suppose
you have already passed this stage and the local network operates stably and reliably. The issue of preference option authentication to SQL Server will leave the user - to choose it should be
For practical reasons, which will be dealt later.
Presets
If your server is already successfully operating in the local network, proceed to configure your firewall, if not, then perform artless surgery on his connection to the
LAN (network cable must be connected, IP address assigned to network interface server). Open My Network Places "and click" Set up a home or small office network "

Fig. 1. Network Setup Wizard
Follow the steps of the wizard, selecting, for example, the values of " Other" - " This computer belongs to a network, which has no connection to the Internet "-
" Computer Name: Server" - the other values, leave the default. Enter the name of your workgroup. On the penultimate step, select " Enable file sharing and printer".
Complete the wizard and accept the proposal to restart the computer.
After rebooting, go to Control Panel and open the "Firewall Windows". It is strongly recommended not to disable the firewall, but only to the following exceptions
network connections. If you do disable the firewall, then go to the next step configuration - see Fig. 5. In Firewall, click the Exceptions tab, and then
button "Add Port"

Fig. 2. Firewall Windows - "Exception"
Add successively 2 ports - 1433 TCP and 1433 (or 1434) UDP:
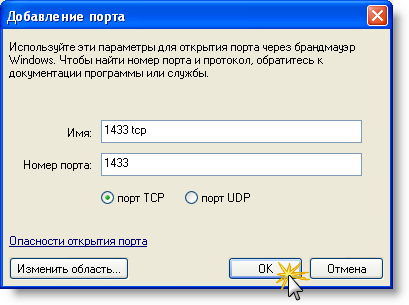
Fig. 3. Firewall Windows - Add a Port
As a result, you should get the following firewall settings - look for items with checked boxes.
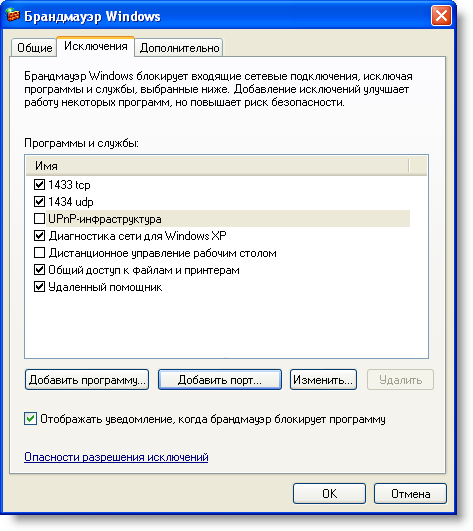
Fig. 4. Windows Firewall
Save the settings and close the firewall Windows. If you are using another firewall, make sure that there are open ports 1433 TCP and 1433 (or 1434) UDP.
This is an important requirement, since without its performance access to SQL server will be closed. For Windows Authentication is also important that customers have easy access to file and printer server.
Then need to configure SQL Server. Go to Start> All Programs> Microsoft SQL Server 2005> Configuration Tools> SQL Server Configuration Manager.
Expand "SQL Server 2005 Network Configuration" and under "Protocols for SQLEXPRESS" protocol "Named Pipes" set the Enabled=Yes. Check the value of similar
parameter for the same parameter in the section "Client Protocols" branches "SQL Native Client Configuration".

Fig. 5. SQL Server Configuration Manager - Protocols for SQLEXPRESS
Sure to restart the SQL. This can be done either in the control panel, snap-in services, either here in the SQL Server Configuration Manager, a branch of SQL Server 2005 Services.
Also, you can simply restart the computer.
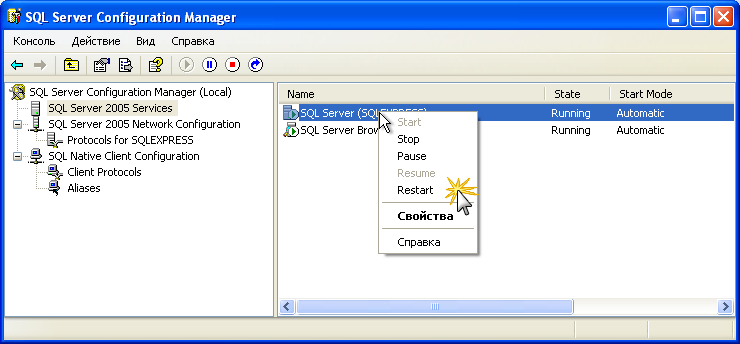
Fig. 6. SQL Server Configuration Manager - SQL Server 2005 Services
Windows Authentication
When using this type of authentication, the client gets access to the database based permissions to your account. Solutions for this and for
other accounts are defined on the server. Consider the option, when the client connects to SQL server under the guest account.
Immediately specify - this method is not suitable for connection to SQL server, deployed on the edition of Windows Home Edition from their lack of a snap to manage local accounts. Therefore, if you use Windows Home, you must use
the second scenario - SQL Server authentication.
Further steps describe the settings for the Windows edition of Professional. Open the desktop and right click on the icon "My Computer". In the context menu, select "Manage":
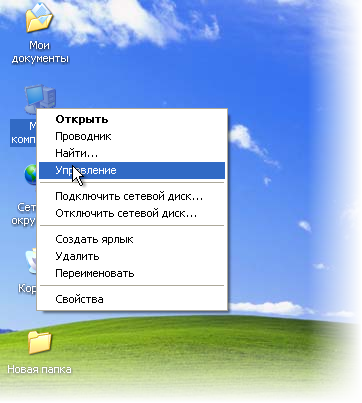
Fig. 7. My Computer - Manage
In the Computer Management ", expand Local Users and Groups" - "Users" and double click on the list of "guest":
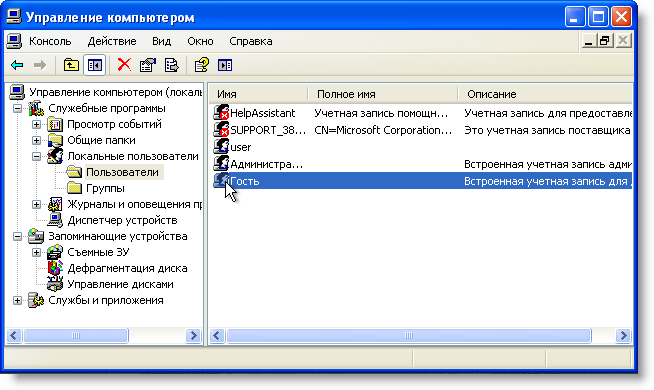
Fig. 8. Local Users and Groups - Community
Check the boxes as shown in the picture:
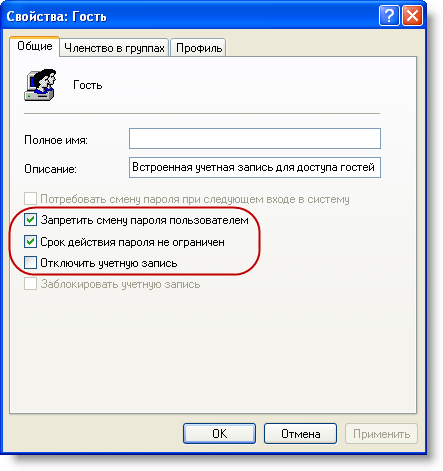
Fig. 9. Features: Guest
Click the tab "Group Membership", then click "Add. Add all the groups, starting with "SQL". More how to do this - see the attached clip at the end.
Save your changes - click "OK"

Fig. 10. Properties: Anonymous - Group Membership
Next, create in any available local hard disk folder, such as "Exchange". Then click the right mouse button and then click Properties.
In the window, click the "Access" tab and check "Share this folder", "Allow changes to files on the network." Click "OK"
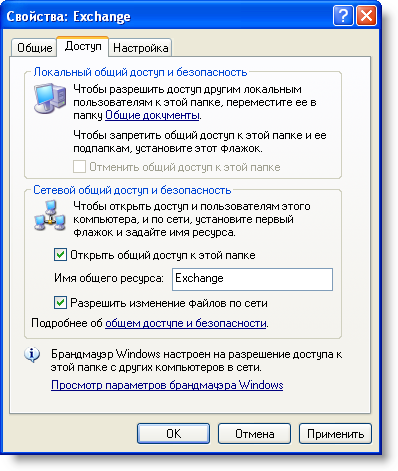
Fig. 11. Properties: Exchange - Access
Then you should check this folder from the network. Click on the client machine, type in explorer UNC path to the server - \\ server and press enter. Or contact the server
Network Neighborhood. You should see the network folders and printers.
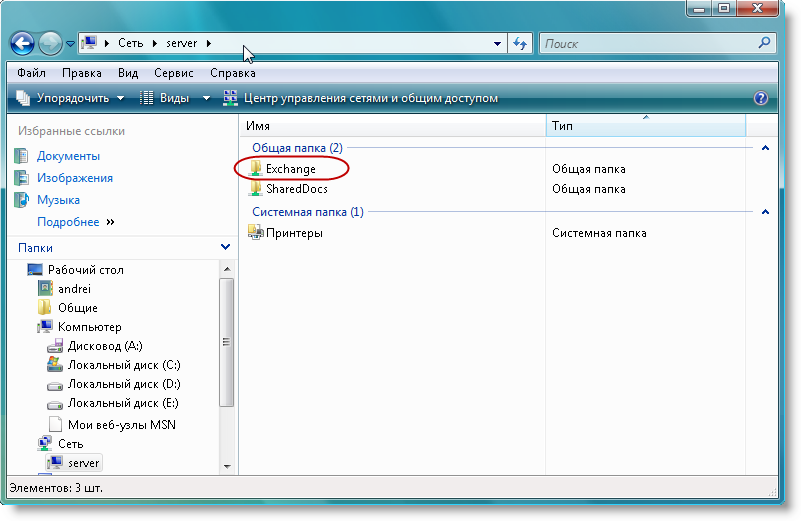
Fig. 12. Network folders and printers
Open the folder "Exchange". If you will be prompted to enter your login and password to access the server, enter: name - "guest" (as in Fig. 8), the password blank and
set in this dialog box save the password. If Group Policy is prohibited to access the server without a password, you will also need to enter your account password (it should already be set previously in Computer Management, under Local Users and Groups "). Important note - here is an example of the connection under the guest account. You can use any other user
recording at your discretion, but always doing the steps in Fig. 8-10.
Then on the same client computer, open the TCU-3, click on "Directories" - "Options" - "Links and the way" - "Change connection" - "MS SQL Server "and enter the following values:
- Server: server\sqlexpress
- Database: tcu_db
- Authentication: Windows Authentication
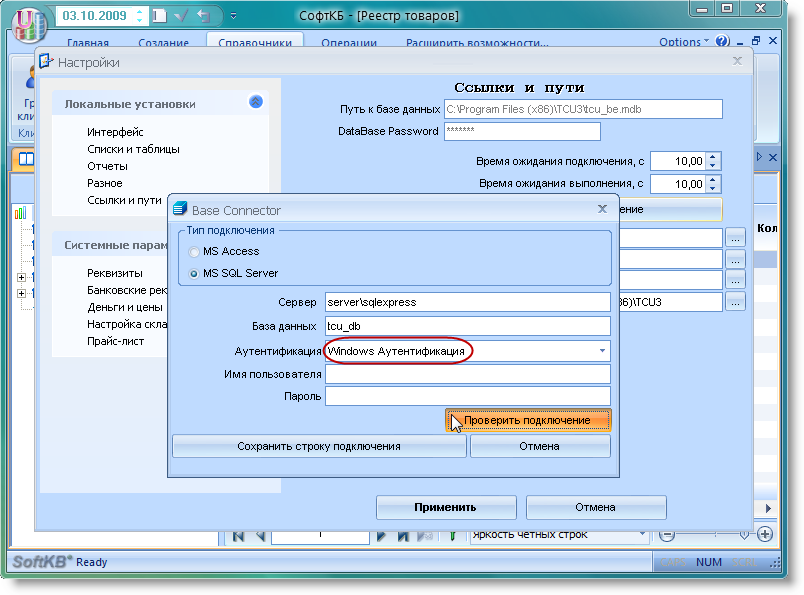
Fig. 13. Customer TCU-3 - Windows Authentication
Check the connection. You should see a message about the successful test connection to the database.
SQL Server Authentication
In practice one often encounters situations where the database server located in another network or in another domain, which is not related trust relationships with the domain server. Or when to use Windows accounts are limited because of various reasons. In such cases it is more expedient to use SQL Server authentication. Significantly, it increases the security of the database itself, because in this case it is protected by login/password for that user who is subject to the right of access to the database and transactions with it. More on this can be found in MSDN, but we shall all the same example.
So, on the server, open the Start> All Programs> Microsoft SQL Server 2005> SQL Server Management Studio Express. In the dialog box "Connect to Server" just click "Connect".
In SQL Server Management Studio Express, right-click on the root of the tree in Object Explorer and click on the shortcut menu "Properties"
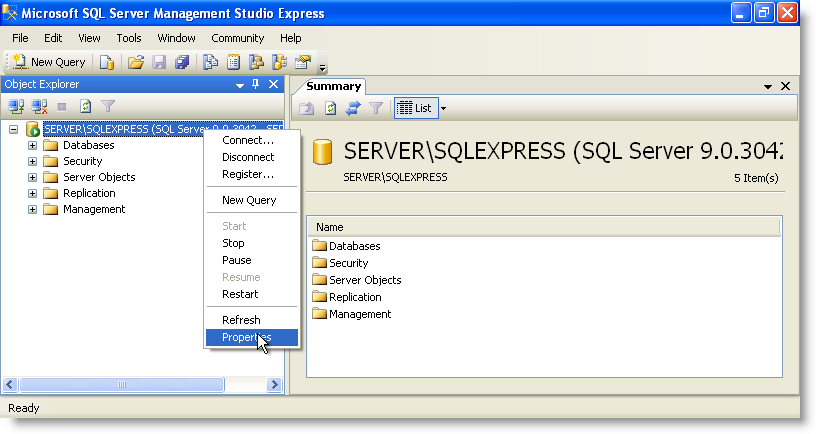
Fig. 14. SQL Server Management Studio Express - Object Explorer
In the server properties, click the section "Security" ("Security") and set the "SQL Server and Windows Authentication mode", as in the figure below:
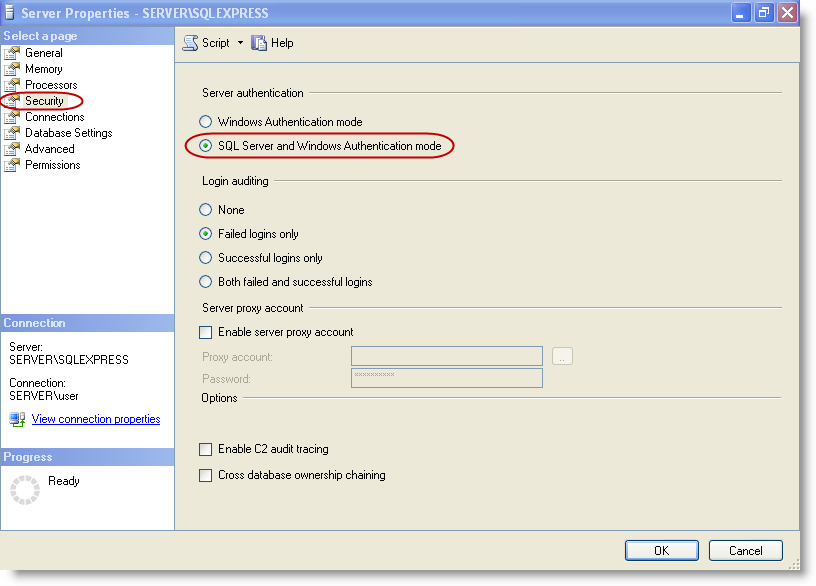
Fig. 15. Server Properties
Close SQL Server Management Studio Express. To continue configuring the server should be sure to restart the service SQL Server. You can do this in SQL Server Configuration
Manager, a branch of SQL Server 2005 Services or using the Services snap, which can lead to "Control Panel" - "Administrative Tools". Also, you can simply restart the computer.
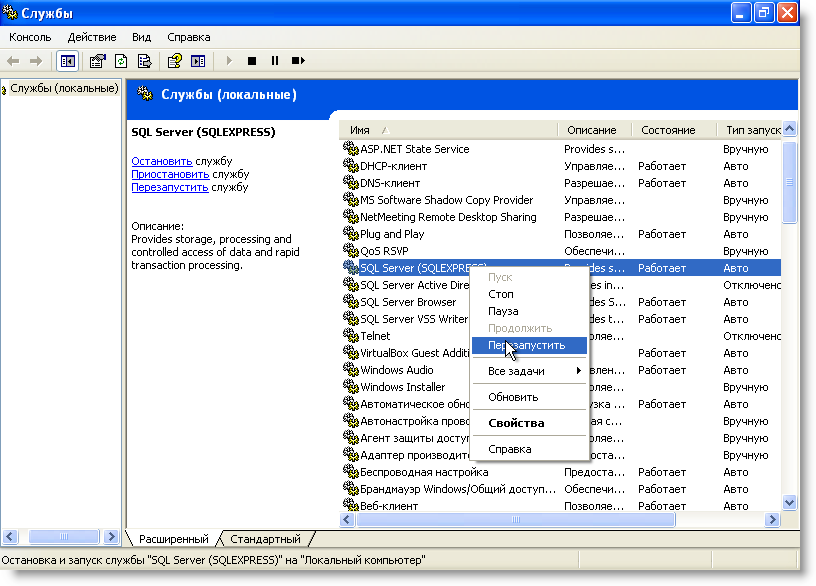
Fig. 16. Services - restart
Re-open SQL Server Management Studio Express. In the object tree, expand the branch "Security".

Fig. 17. SQL Server Management Studio Express
Right-click on the branch "Logins" and on the shortcut menu, select "New Login ..." In this dialog box, specify the database user name, password, etc. Look carefully at the picture
below and set the parameters on the form is similar to the figure. Then click "OK"
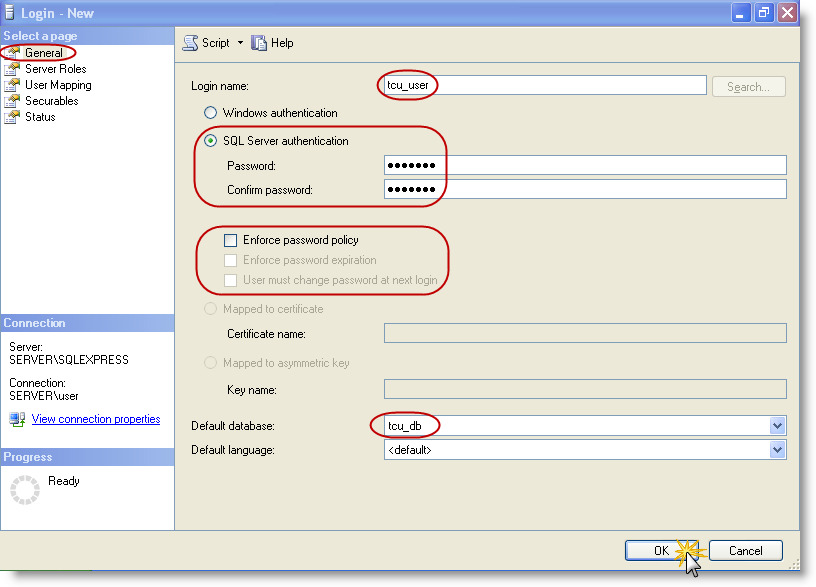
Fig. 18. Login - New
In the object tree, in the section "Logins" appears the name you just created. Open the form properties of the user double clicking on it in the tree.
Go to the page "User Mapping". Also watch the installation settings in your form. Any discrepancy in the rules may be exposed to can not connect to the database for this user.
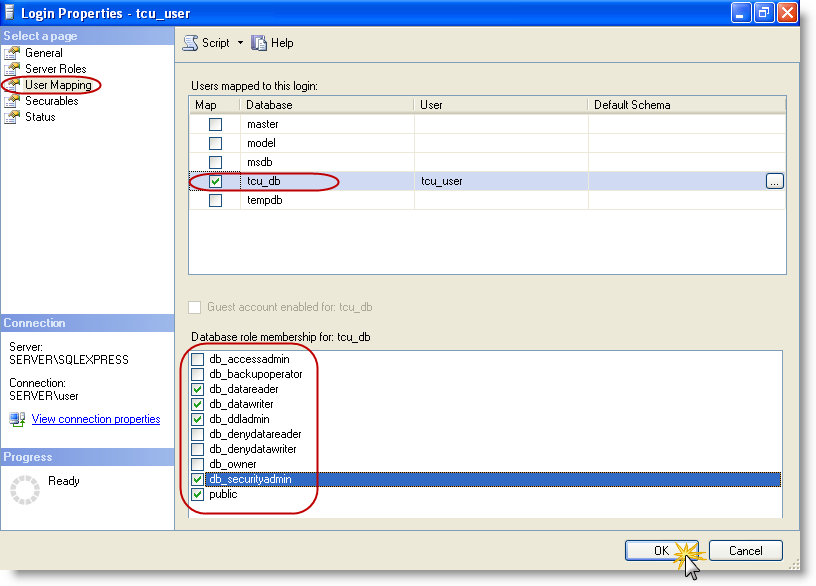
Fig. 19. Login properties - tcu_user
Final step - check the connection TCU-3 to the database (on the client computer). Click on "Directories" - "Settings" - "Links and Ways" - "Change connection" - "MS SQL Server" and enter the following values:
- Server: server\sqlexpress
- Database: tcu_db
- Authentication: SQL Server Authentication
- Username: tcu_user
- Password: ******* (passwords specified in Fig.18.)

Fig. 20. Customer TCU-3 - SQL Server Authentication
Click "Test Connection". Got the message "Test connection was successful? Congratulations Your SQL server is ready accept connections TCU-3 with SQL Authentication!
As usual, the leadership of such complexity, we accompany a video tutorial showing the steps in this article from first to last paragraph.