The article deals with how to configure the synchronization between the computer and mobile device that is running Windows Mobile®. Given the commonality of approaches to address this problem the article should not be regarded as highly specialized, referring only to devices with TCUMobile. It is designed to help all users who have difficulty in setting up the synchronization via ActiveSync®, including the Bluetooth. That is why the article is accompanied by a large number of screenshots, with detailed explanations. Even though the abundance of this information in the information space.
Essence of synchronization between TCUMobile2 (application running on the mobile device) and the main accounting system is to exchange files with the data - when you update the database on the PDA of TTSU (the main accounting system) in the PDA is placed cut base Data TCUMobileBase.xml, using The following methods of synchronization, as if made of sales, order and payment from the PDA into the main accounting system files are loaded and nakl.xml list.xml, containing the information about the transactions. Transport for the exchange of data is to synchronize the mobile device with your PC using ActiveSync®, which, in turn, works with a company Exporter2 SoftKB. More information about configuring Exporter2 can be found in the Manuals TCUMobile2 .
To set the computer to synchronize your mobile device:
- PDA, it is "PDA", he "PocketPC". Deliberately does not focus on the types of devices - communicator, smartphone, etc. The device must run an operating system Windows Mobile® versions of all - 2002, 2003, 2005 and above.
- computer operating system Windows XP® and above.
- installed on a computer program ActiveSync® 4.5. Download the program from the site producer - visit downloads. for more information on installing ActiveSync® will not stop - the program provides more than 20 languages, so the difficulty with the installation should not occur. If you are using Windows Vista®, make sure that the version of the Center for Devices Windows Mobile is not below 6.1. Download the latest version, you can link with the site © Microsoft
- Cord (cable) to connect the PDA to the computer (from the kit to the PDA) - instructions for setting up synchronization , a fixed Bluetooth-Adapter - instructions for setting up synchronization .
I. Synchronize PDA with your PC via cable.
further will provide detailed instructions for setting up the synchronization. An example is given for the operating system Window XP®, and PDA HP2190 iPAQ c Windows Mobile® 5.0.
So, ActiveSync® is installed. Click on the ActiveSync® icon in the notification area of the taskbar - open window.

Fig. 1. Windows ActiveSync® - waiting for connections.
Connect the cord to the PDA. Badge program will become green and begin to rotate, as in a box appears "Connecting to"

Fig. 2. Windows ActiveSync® - Connecting.
After a while the message - then click "OK" (skip the synchronization with Outlook. The theme of this article shall not be considered .):

Fig. 3. ActiveSync® - recommendation to synchronize with Outlook.
In the next window, click "Next":
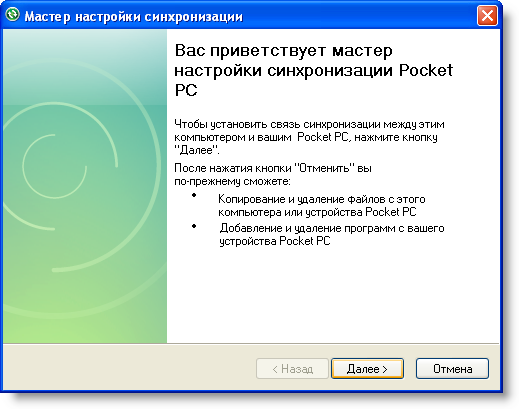
Fig. 4. ActiveSync® - Wizard synchronization.
In the next window, click "Next":

Fig. 5. ActiveSync® - Wizard synchronization.
In the next window, select the checkbox in the "Files" (if checked in the "Favorites", then uncheck it):

Fig. 6. ActiveSync® - Wizard synchronization.
Immediately after installation check box in the "Files" message appears. Click "OK"

Fig. 7. ActiveSync® - synchronize files.
In the next window, click "Done":

Fig. 8. ActiveSync® - Wizard synchronization.
wait until the end of the synchronization wizard:
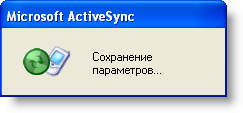
Fig. 9. ActiveSync® - the completion of the synchronization wizard.
Immediately upon completion of the wizard will begin the synchronization process synchronization. This process is always accompanied by the rotation of the green arrow icon in the window ActiveSync® (and in the notification area of the taskbar), and begins to fill a string of progress:

Fig. 10. ActiveSync® - Timing.
wait until the synchronization process:
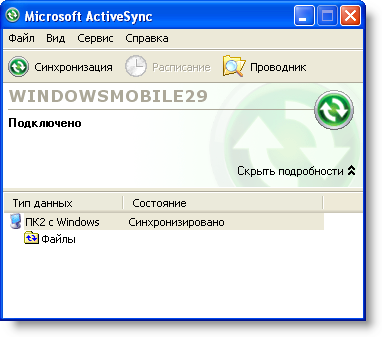
Fig. 11. ActiveSync® - the synchronization is finished.
When configured in this way synchronization of the exchange of files between folders "My Documents" of mobile devices and documents to WINDOWSMONILE29 "created on a computer specifically for your mobile device. If some mobile devices, each will create its own folder corresponding to the device name.
II. Synchronize PDA with your computer using Bluetooth
If your phone has Bluetooth, you can adjust the synchronization using this technology. Of course, you also need to connect the Bluetooth-adapter to your computer and install the appropriate drivers for it. Description of the installation is outside the scope of this article and will not be considered here - see the documentation for your Bluetooth-adapter. Typically, the drivers supplied with the device and to determine their particular skill is not required.
For example, drivers are installed, the device is working properly. Before continuing the synchronization settings, make sure that the installation is correct - go to Device Manager. Right click on the "My Computer" on your desktop, then click the menu item "Properties":

Fig. 12. Calling Device Manager.
window "System Properties" click the button "Device Manager":

Fig. 13. Calling Device Manager.
Make sure that under "Ports (COM & LPT)" is installed Bluetooth Serial Port. Port numbers may be different, just remember the smallest port number (in this example - COM5). If the port does not, it means that your Bluetooth device was not installed the necessary drivers or they are installed incorrectly. In this case, the continuation of the settings can not be synchronized.

Fig. 14. Ports (COM & LPT).
Close Device Manager and open the ActiveSync® - click on the ActiveSync® icon in the taskbar notification area:
Fig. 15. Windows ActiveSync® - waiting for connections.
in the "File" menu select "Connection Settings":

Fig. 16. Windows ActiveSync® - waiting for connections.
Verify the installation checkboxes as shown in figure 17. In the drop-down list, set the COM-port you remember earlier (see Fig. 14). Then click the button "OK":

Fig. 17. Connection Settings.
now proceed to set up PDA. As you remember, setting the synchronization is described by the example of connecting PDA HP2190 iPAQ c Windows Mobile® 5.0. Of course, the following screenshots may differ from the screenshots of your device if it is not HP2190, but all differences are in details that do not change the essence of the synchronization settings for Bluetooth:

Fig. 18. Desk "Today".
Click Start - Settings - Connection. Then click Bluetooth:

Fig. 19. Setting up connections.
the opened form, click the button activate Bluetooth. Then navigate to the dispatcher Bluetooth - click Bluetooth Manager:


Fig. 20. The inclusion of Bluetooth.
Create a new shortcut - click on "New":
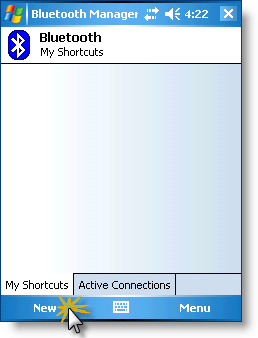
Fig. 21. Create Shortcut.
In Connection Wizard, click the list item "ActiveSync® via Bluetooth":

Fig. 22. ActiveSync® via Bluetooth
Take steps wizard. The last steps, click on the found device with Bluetooth (for example, is a computer with the name of "office-x86 "):


Fig. 23. Connection Wizard.
starts the search services provided by the device found. According to the protocol Bluetooth device must provide access to serial ports of your computer (remember Fig. 14):


Fig. 24. Connecting to the serial ports.
Choose a port number, as in Fig. 17. Then finished with a connection wizard - click "Finish":


Fig. 25. Completion of Connection to the serial port.
Create a shortcut to display the connection established:

Fig. 26. Create a shortcut to an established connection.
If the connection is not automatically established, run it by force - double-click the shortcut, or press the shortcut stylus and the stylus does not release until you see the menu. In the menu, select "Connect":


Fig. 27. Connect using a shortcut.
Immediately after you connect to a computer screen, you should see a message about connecting the device and start the process of synchronization using ActiveSync®:

Fig. 28. Completion of the connection and start the process of synchronization through ActiveSync®.
The following steps will not describe because they are completely identical to those described in previous section , starting from Fig. 2.
When configured in this way synchronization of the exchange of files between folders "My Documents" of mobile devices and documents to WINDOWSMOBILE29 "created on a computer specifically for your mobile device. If some mobile devices, each will create its own folder corresponding to the device name.
In conclusion,
article would like to remind you that it focused on the technical side of the synchronization, ie Configuring transport, ensuring the transfer of data between the computer, which provides access to the main accounting system and the mobile device, working with "slices of data" the main accounting system. The process of exchanging data at the application level is described in User Guide TCUMobile2 .